Friday, January 18, 2013

One More Sauce to Die For- Sandwich Sauce

Around here we love sandwiches. Like, LOVE them.
With homemade bread, there's almost nothing better. So when I found this recipe for a tasty sandwich sauce I couldn't resist. After all, I am a sucker for scrumptious sauces! ;)

Honey Mustard Sandwich Sauce
Here's what you'll need:
1 cup mayonaise
1/3 cup yellow mustard
1/4 cup honey
2 tsp balsamic vinegar
1 Tbsp sugar
Mix all ingredients together, funnel into a squeeze bottle. Enjoy!


(sometimes I add other fun flavors to this base: pepper, dill, beau monde, etc.) MMM MMM MMM! So tasty!


Wednesday, January 16, 2013

To-Die-For Chocolate Sauce

I am only able to make this chocolate sauce a couple times a year because I just eat it too fast and its just too good...

To-Die-For Chocolate Sauce


1 1/2 Cups chocolate chips (I use milk or dark, but great with semi-sweet also)
1/2 Cup butter (the real stuff)
1 1/3 Cups sugar
10 oz. evaporated milk

In a small heavy saucepan, melt the butter and chocolate over medium heat. Add the sugar and gradually pour in evaporated milk. Bring mixture to a boil; reduce heat. Boil gently over low heat for about 8 minutes, stirring frequently. Remove from heat and allow to cool slightly. Serve warm over ice cream.
You can cover a chill any leftovers for up to a week.

Ta dah! Just don't blame me if you get addicted. :)

Monday, January 14, 2013

On Resolutions

Well, its already half-way through January... have you been keeping your New Year's Resolutions?
I really enjoy making new resolutions each year, but rarely completely fulfill all of them. They are usually filled with good intentions, but I guess its just hard for me to find the motivation. I tried to make really attainable goals this year, so blog followers, YOU can hold me accountable!
Here are my goals for the wonderfully lucky year of 2013...
  1. Be better organized. -this includes my kids' room, kitchen, and all our paperwork... my three organizational challenges.
  2. Get our food storage up-to-date. -72-hour kits, 3-month supply, and longer term storage included.
  3. Budgeting. -we are generally good at CREATING a budget, just not STICKING to one.
  4. Intentional teaching. -be more active in intentionally teaching my children.
  5. Be more unified. -as a couple, as a family, and as a member of my church.
  6. Get fit. -I don't plan on becoming pregnant for a couple more years, so I want to really focus on getting my body healthy again. This includes exercising 3 times a week (even if its just walking my kiddos to the park... that totally counts in my book!), eating 5 vegan meals a week (I normally do eat 3 or 4 vegan meals), and eating more healthy in general.  
  7. Attend the temple 12 times this year.
Not too difficult, right? I sure hope not!

What about you? What are your goals for the new year?

Tuesday, January 8, 2013

On Potty Training

After some nudging from a good friend of mine who recently potty trained her not-quite-two-year-old little boy, I've decided to write a post about how I trained my daughter. I told her she should be doing the post and not me, but that didn't work, so here goes nuthin'.:)

Now, when I was preparing to potty train Princess, I read a ton of material. Blog posts about how mom's have a 100% success rate with their method, books, articles endorsed by pediatricians, etc. I thought I would have her trained in a hour flat and never have to change another one of her diapers again! Yeah, it just didn't happen that way for us!
I was able to potty train Princess when she was just about two-and-a-half. Despite the many, many things I read about not starting and stopping potty training, that just didn't work for us. When I first tried with Princess, she contracted a very bad case of RSV shortly into our training, so I immediately stopped. Strike one. Then about six weeks later, I tried again, but realized she just wasn't ready to be potty trained. She would stay dry for the most part, but refused to do her -ahem- 'dirty business' in the toilet. I decided after the fifth or sixth 'number two' accident that we would try later on in the summer, after things calmed down in our lives a little bit. Strike two.We were gearing up for a long family road trip, and I just didn't want to deal with that on our vacation.
SOOO, finally in June I decided this was the time it was going to stick, and I buckled down. I ended up sort of combining a few tips & tricks I'd read about and made a hybrid method that seemed to work great!
Right when Princess woke up that glorious morning, I took her out of her diaper and put her in big girl underwear (she calls them 'nunders') and a t-shirt. I told her that we were going to have a really fun day together, and that if she could keep her 'nunders' dry all day, I'd give her a surprise. I had decided earlier that we were just going to spend the majority of our day in our kitchen, where there is a bathroom close and its easy to clean up any accidents. No TV or movies for the day; just her and I and lots of coloring, puzzles, and books.

We headed down to the kitchen and started our day with a big sippy full of apple juice. I set our kitchen timer for 15 minutes, and each time it went off we headed to the big girl potty. I'd set her up there on her toilet seat and wait. If she did end up going- even just a drop or two- I'd do a little jig and sing the song my mom sang to me when I was little. It goes like this...
I'm proud of you
So proud of you
And I hope that you are proud as I am 
Proud of you 
I'm proud of you....
And I hope that you are proud of you too!
She then got 2 (because she was two) M&M's each time she was successful on the potty.  She even got to choose which colors she wanted! 
After about two hours of this, I pulled out her baby doll. I told her that her baby doll is learning how to wear big girl nunders too and I let Princess play with her for a few minutes. Then I took the baby doll and in my stealth mommy-mode, slipped a syringe full of water behind her and made the baby 'have an accident' on our kitchen floor. I then gasped at the baby and said 'Baby doll! We don't go potty on the floor. We go potty in the toilet.' Then I took the baby to the toilet and she went potty in the toilet, all with Miss Princess watching. She thought it was pretty funny, but honestly, I think that's what solidified the idea in her head. 
After the incident with her baby doll, she started telling me when she needed to go to the bathroom. I think that's when I knew she got it. When she started asking me. She did have two little accidents that day, but that was it! The next day she was dry all day, and I told her that for lunch the next day I would take her to go get chicken and fries. That was her surprise because my little Princess thinks that getting 'chicken and fries' is the coolest thing to do in the whole world. Isn't that funny? We even threw in a little ice cream cone to celebrate.
After she was fully potty trained by day, I still put her to bed in a diaper. However she would always wake up with a dry diaper so I just decided to give it a try and put her to bed with underwear on. She hasn't worn a diaper since! She is day and night trained, and I couldn't be happier!

A couple of notes:
  • before beginning potty training, I had let my daughter watch me go to the bathroom. I believe this can help in the process of training, but of course, isn't for everyone.
  •  I didn't expect to night-train her for a while, but it ended up working out for us; I don't have any words of advice on that, sorry!
 Hope this helps those mom's out there think about potty training!

What about you? What successes have you had in potty training?

Tuesday, December 11, 2012

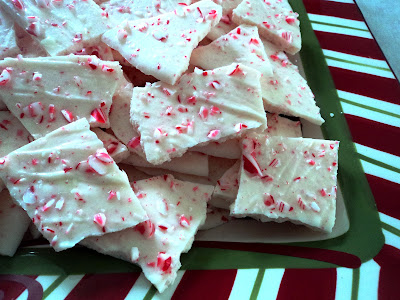
Peppermint Bark

Yep, another Christmas recipe. I don't think I could ever get sick of 'em! This one comes courtesy of my wonderful, awesome, amazing sister. Don't let the measly two ingredients fool you. Once you pop one piece of this deliciousness into your mouth, you'll want to devour the whole batch!

Peppermint Bark
  
1 bag white chocolate chips
6-10 candy canes (to taste)
Place desired amount of candy canes (or you could use just peppermints) into a Ziplock bag and crush well. Melt chocolate chips (and 1 Tbsp oil, if desired... sometimes this helps white chocolate not seize up) in microwave for 1 minute. Stir, and keep melting in 15-second increments until smooth. Place a sieve over melted chocolate and add candy canes. Shake the sieve. This allows only the powder to fall into the chocolate. Add as much or as little as you want, mix well. Pour peppermint chocolate onto foil-lined cookie sheet and spread relatively thin. Sprinkle top with larger candy pieces. Let set and cool.

Voila! Tasty, festive goodness. Merry Christmas!


Thursday, December 6, 2012

On Breastfeeding

Yep, I'm going there.
And no, I am not going to post any pictures. I know I know, what's a blog post without pics? Well, I guess I'll give you one, but not of breastfeeding...
Princess's blessing day pictures, December 2009
I have a lot of people in my life that are very opinionated about breastfeeding. I also have others who are very UNopinionated about it. I get to see both sides of the spectrum on this issue, which for me, has been a real eye-opener.
There are many, oh so many, women out there that feel that breastfeeding is the only way to feed your baby. That if you don't breastfeed, you're dooming your child to a life of low immunity, high obesity chances, and abandonment issues. Okay, I know this is the very extreme viewpoint, but I digress. It is a very real ideal, believe me.
I have always been a big supporter of breastfeeding. I have also had MAJOR issues with breastfeeding both my children. If you don't already know, nursing is hard. Really hard. For some women it does come very naturally and easily, but I am not one of those women. I wanted so badly to be able to nurse my babies! I remember with Studley trying to nurse him almost constantly, but knowing he was not getting enough to eat. Watching him fuss and cry and try so hard to get something to eat was so heart-wrenching. It was so hard for me to have to admit defeat.
With both my children, I was only able to breastfeed until they were about four months old. And every time I went to feed them from a bottle instead of nurse them I felt judged. I felt like all the other moms that saw my child eating from a bottle were looking down on me for the horrible decision I made to feed my child that horrible f-word... formula. I hated that feeling!  I just wanted to shout, "I tried! I tried with everything I had to nurse my baby!"
I guess all I want to put out there is that its okay. If you can and want to nurse your baby until they're four, its okay. If you don't ever want anything attached to your chest, its okay. If you want to try it out to see if it works for you, its okay. If it doesn't end up working out for you, its okay. YOU are the mama, YOU are one with the miracle body that created your beautiful child. YOU are capable of making the best decisions for your baby, and YOU know your own abilities.
Whew! That feels good. :)

What about you? How do you feel about breastfeeding?

Monday, December 3, 2012

My Adorable $4 Christmas Wreath

So I used THIS tutorial as a guide to make my wreath, with some alterations to make it more 'me'. I do love burlap, but I decided to make my ruffles out of duck cloth. I had an awesome coupon for some awesome duck cloth that was awesomely on sale. ANYWAYS, here's what you'll need:


~ 12" straw wreath (I found mine at the DI for $1)
~1/4 yard each red and white duck cloth ($2 w/ coupon)
~1/4 yard green tulle ($0.25)
~Glue gun and LOTS of gluesticks
~Ornaments (I only used 3 $0.75))


Cut the cloth into strips. My strips ended up being about 2 1/2 inches wide and 12ish inches long. I am not a big 'measurer', so I just winged it.
Hand sew a loose thread along the long edge of the strip. Pull tight, creating the ruffle, and tie off. Repeat for each strip of fabric. I ended up using 10 red and 10 white.

Glue your ruffles in alternating colors all the way around the wreath. I had to use three clue sticks to get all mine on.

After all your ruffles are on, create the embellishment with tulle, ornaments, and LOTS more glue.


Enjoy your Christmas wreath, and Merry Christmas!